Integration Testing
Overview
This guide explains how you can set up integration testing for your microservices running in Kubernetes using Signadot Sandboxes. First, there is a description of how sandboxes can help with the problem of integration testing and then there are concrete details of how you can set up sandbox environments to run tests against your services.
Background
As development teams iterate on microservices independently, it is important to ensure that relationships between services are healthy with each change being made. Integration testing helps in ensuring this by testing changes in each service against upstream and downstream dependencies of that service so that they work well in conjunction.
In the absence of such testing, there are often issues that are discovered late in the development lifecycle causing long feedback loops and wasted development time in finding and resolving issues that could be caught much earlier.
How Integration Testing Works with Sandboxes
Sandboxes provide a lightweight test environment that can be spun up quickly in the context of the real cluster and dependencies to run integration tests.
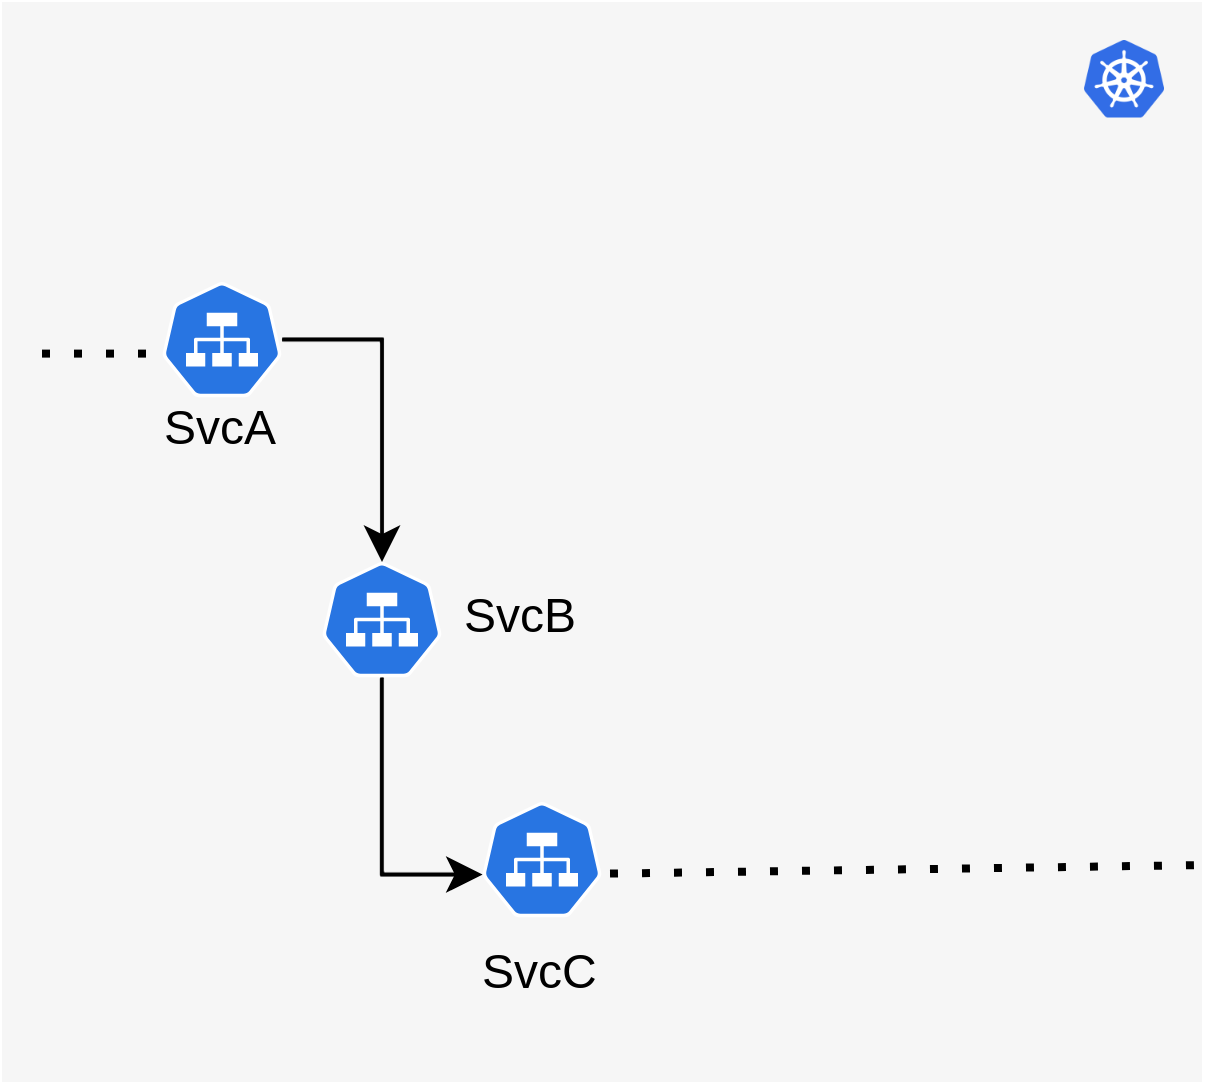
The example above shows a simplified partial view of 3 services, svcA, svcB and svcC, of which
we want to write integration tests for svcB to ensure that any changes to it work well with svcA
and svcC. The arrows show the path a typical request through the system takes. In this
application, svcB calls svcC and uses some functionality on it, and in turn, svcA calls
svcB. Now, with new changes being introduced in svcB, those changes need to be tested in the
context of svcA and svcC.
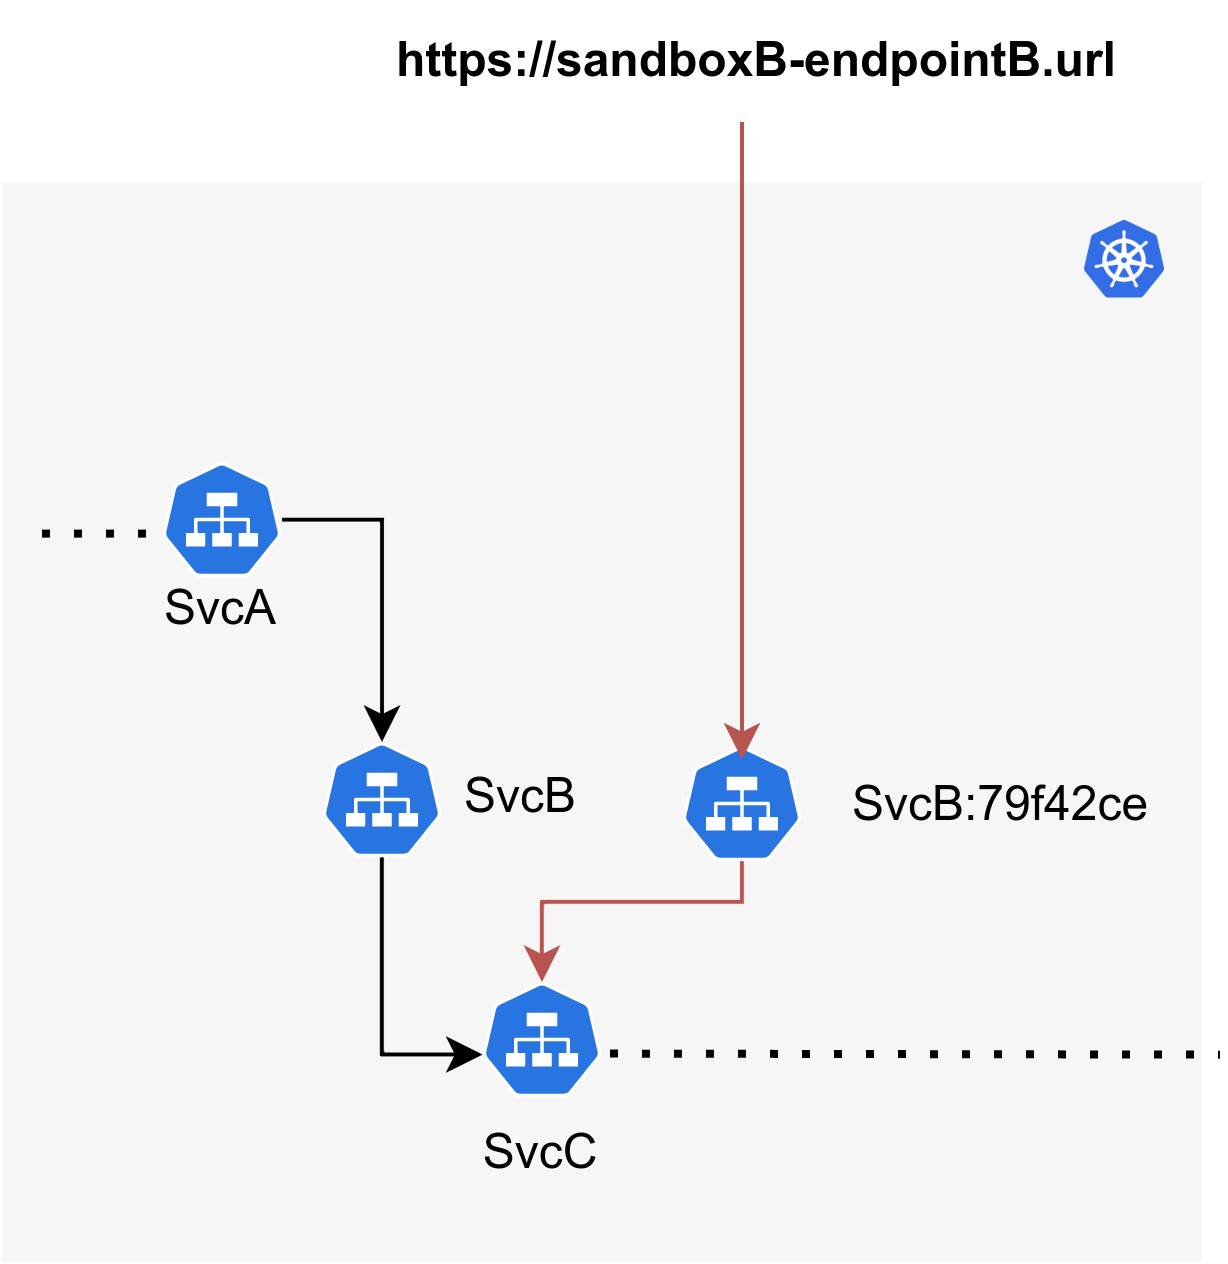
With Sandboxes, you can create a Sandbox that just contains the forked version of svcB in the
Kubernetes cluster. By making use of request routing, all
endpoints associated with this Sandbox will automatically be routed via the forked workload
(represented in the diagram as svcB:79f42ce).
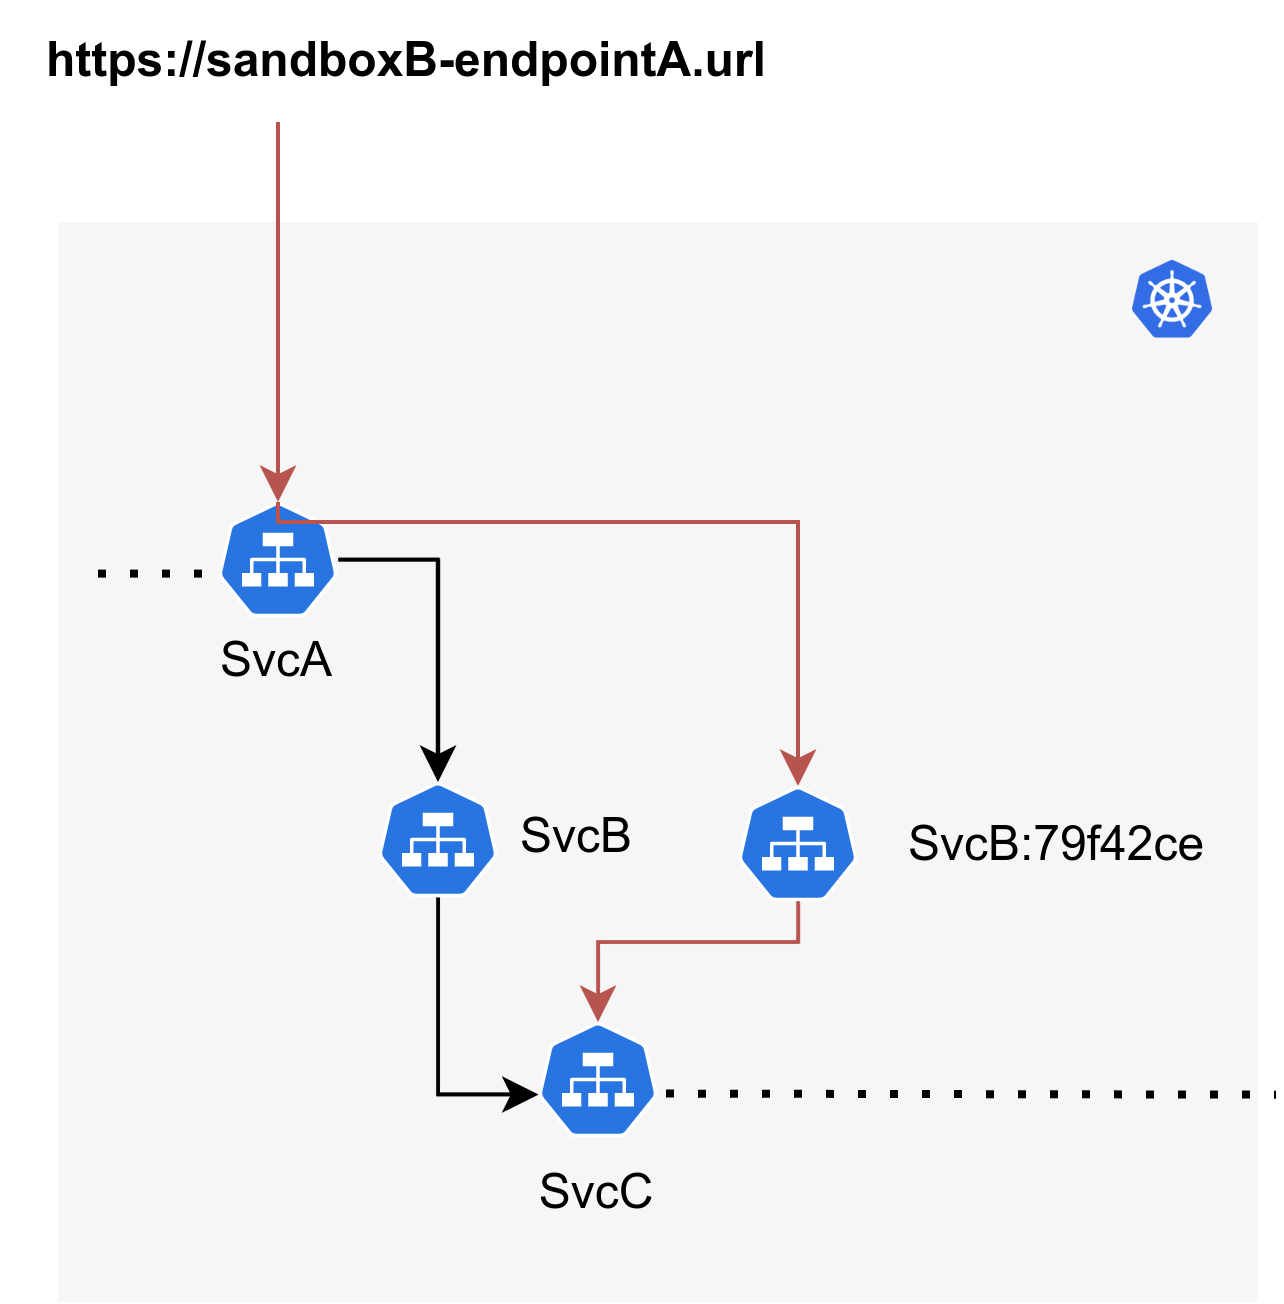
To write integration tests to test the B->C relationship, you'll just need a single endpoint
pointing to the forked version of svcB (svcB:79f42ce) and using that endpoint, you can
write and run integration tests against it. For the A->B relationship, you can just create another
endpoint that points to svcA and run tests against that.
The benefits of using this approach of sandboxes over other approaches for integration testing are:
- Tests run a real environment that closely resembles production thereby providing high-quality signals unlike environments composed of mocked dependencies.
- Each sandbox spins up in seconds and can scale to hundreds or thousands of environments easily at nominal infrastructure cost as each sandbox only deploys the minimal set of services that have changed.
For testing more complex scenarios that involve management of stateful components like databases, message queues, etc, refer to the reference documentation on sandbox resources.
How to set up Integration Testing for a Microservice
This section details the actual methodology of building a sandbox specification for running integration tests on a particular service. Taking the same scenario described in the previous section, the steps below explain the workflow for how you can build a sandbox specification, manually test it using endpoints, and then automate this entire workflow within your CI/CD pipeline.
If you have a sandbox specification already and are looking for a way to set it up in your pipeline for each pull request, refer to the CI Integration Guide.
Pre-requisites
- Signadot CLI is installed and configured correctly with your account.
- Kubernetes cluster with the Signadot Operator installed that has been connected to Signadot.
Typically, the connected Kubernetes cluster would already be running the baseline version of services that are up-to-date with the master branch so that the latest versions of dependencies can be used by each Sandbox that is set up.
Writing a Sandbox Specification
Continuing to use the above example with 3 services, the first step is to write a sandbox
specification that can be used to create a Sandbox for integration testing. For example, in this
case, to test the B->C scenario against each change in svcB, the simplest possible specification
is shown below.
name: my-test-sandbox
spec:
  cluster: my-cluster               # name of cluster (as per app.signadot.com)
  description: sandbox for running integration tests on svcB
  forks:
  - forkOf:
      kind: Deployment              # With respect to the baseline environment, this
      namespace: default            # forks (clones & customizes) svcB only into this sandbox.
      name: svcB
    customizations:
      images:                       # this image will be applied to the forked version
      - image: repo/image:abcdef    # of svcB.
  defaultRouteGroup:                # CLI v0.3.7+ required (see sandbox specification for details)
    endpoints:
    - name: my-endpoint         # endpoint that points to svcB within the cluster.
      target: http://svcB.default.svc:8080
Once you have configured the sandbox specification for svcB, you can test it by creating the above
sandbox as specified on the Kubernetes cluster using the CLI.
% signadot sandbox apply -f my-test-sandbox.yaml

Created sandbox "my-test-sandbox" (routing key: ...) in cluster "...".

ENDPOINT    TYPE     URL
my-endpoint      fork     https://my-endpoint--my-test-sandbox.preview.signadot.com
If you want to set up tests for the A->B case that was mentioned above, the specification of the
sandbox remains the same as above except for the addition of a new host
endpoint that points to svcA. Note that this specific case will require
that header propagation and sandbox
routing are set up correctly in svcA and svcB which is not a
strict requirement for the B->C case since the endpoint directly points to the forked version of
svcB.
Using Endpoints
Once you have created the sandbox and obtained the endpoint, you can exercise it manually to ensure
that our configuration is correct. The endpoint URL that is returned above is authenticated and
points to the forked version of svcB and can be used to run tests against it using an API key
that you can retrieve from the Signadot Dashboard at https://app.signadot.com.
curl -H "signadot-api-key: ${SIGNADOT_API_KEY}" \
  'https://my-endpoint--my-test-sandbox.preview.signadot.com'
Once your test is successful, to delete your sandbox, you can use the following command:
% signadot sandbox delete -f my-test-sandbox.yaml
Integrating with CI
Once you have verified that the Endpoint tests the new workload as expected, you can use the sandbox specification you created above and set up CI automation such that a new environment is created automatically for each pull request commit.
Next Steps
This guide described a basic sandbox that can be set up to write and run integration tests against a single service in a microservices stack. Building on these fundamental constructs, you can build sandboxes that use sandbox resources and support ephemeral stateful components associated with a sandbox or fork multiple services within one sandbox to test more complex scenarios.